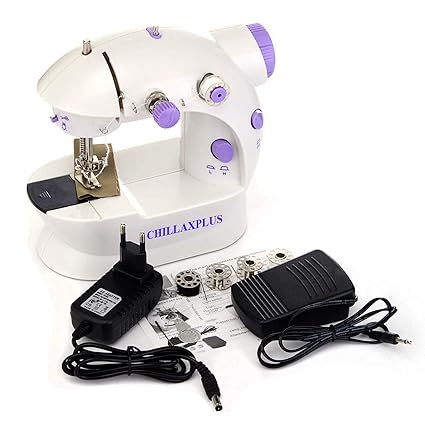
Sewing & Embroidery Machines By CHILLAXPLUS
by CHILLAXPLUS
Price:  1499
1499
 2199
2199
 1499
1499
 2199
2199
You Save:  700.00 (32%)
 700.00 (32%)
CHILLAXPLUS Portable 4 In 1 Mini Sewing Machine With Adapter And Foot Pedal - Product Features
- Adjustable Straight Stitch And Reverse Sewing - Practical Mini Machine For Mending, Hemming And Basic Sewing.
- Choice Of Foot Pedal Or Auto-Sewing Mode - If It'S Not Convenient To Use The Foot Pedal, You Can Set The Sewing Speed To Either H For High Or L For Low.
- Sews In A Durable Chain Locking Stitch. Small And Portable - Runs On Either Ac/Dcpower Or 4 Aa Batteries (Not Included).
- Colours As Per Availability.
- Some mini sewing machines feature a secondary bobbin spindle on the front of the machine, towards the right side. You can place a bobbin here instead of using a full-sized spool for the top thread.
- To use this secondary bobbin spindle, remove the cap and slide the bobbin onto the post. Then push the cap back on so the bobbin clicks into place securely.
- Keep the machine turned off while you thread it to avoid any accidents.
- Guide the thread from side to side so it fills up around the entire post of the bobbin.
- When the bobbin is completely full, cut the thread to separate the bobbin from the spool.
- With most machines, you ll push the thread through one loop and then pull it firmly between two tension disks.
- After this, you ll direct the thread through a hole or hook on the take-up lever, which moves up and down and is located on the left half of the machine, above the needle.
- Finally you ll draw the thread down towards the needle, often passing through a hole below the take-up lever and another right above the needle.
- Refer to the machine s instructions if you re not sure which direction to thread the needle.
- Trim the end of the thread so that it s smooth and not frayed, and wet it with your tongue to keep the fibers together.
- Once the needle is threaded, tug about 5 in (13 cm) of thread towards the back. This will prevent it from slipping back through the eye as you begin moving the machine s mechanisms.
- The cover is a thin plastic piece that rests on top of the bobbin compartment. Slide it off, either towards the left (if the bobbin compartment is to the left of the needle) or towards you (if the compartment is directly in front of the needle).
- The bobbin thread should match the color and fiber content of the top spool of thread you re using.
- Pull the loose ends of thread until there s about 5 in (13 cm) of each strand extending past the needle before you turn the hand wheel.
- If your machine has a thread channel next to the bobbin compartment, you can slip both threads into this channel to line them up while you turn the hand wheel. Make sure you re still holding the loose ends firmly.
- You can gently pull the top thread upwards to expose the loop so it s easier to grab onto.
- Pull the loose ends of both threads towards the back of the machine, passing them under the presser foot. Now you have a correctly-threaded machine!
- Slide the bobbin compartment cover back into place when you re done.
- Keep the machine turned off as you connect it to its power source to prevent any accidents.
- The narrow end of the pedal should be closest to you.
- Think of the foot pedal like the gas pedal of a car. When you press it, the machine will run.
- It s helpful to start with a test scrap of fabric before moving onto your project.
- Align the fabric so that only about 1?2 in (1.3 cm) of fabric extends past the needle. The end of the fabric should align with the back side of the presser foot.
- If you don t have enough fabric past the needle to begin with, it might get sucked down between the presser feet. This will jam up the machine.
- You should never sew directly over pins. Remove any pins as you go, before sewing the seam.
- Before you begin stitching, hold onto the loose ends of both threads, gently pulling them them taut towards the back of the machine. This will ensure your stitching gets off to a good start and that the machine doesn t come unthreaded.
- The fabric will move away from you, towards the back of the machine.
- Use your hands to gently guide the fabric, but keep them well away from the needle for safety.
- You can press the backstitch button or lever (usually located on the front of the machine) to make a few stitches in the opposite direction. Do this at the start and end of your row of stitches to prevent them from unraveling.
- Move the fabric gently, since the threads are still connected.
- You also don t want to tug on the fabric too hard as this could break the needle.
- Trim the thread as closely to the fabric as you can for the neatest finish.
- The tension dial controls the tension disks that you sandwiched the top thread between when you threaded the machine. Sometimes it will feature numbers to indicate which tension setting you re using.
- If you re switching between thin fabric and thick fabric or bulky layers of material, you ll likely need to adjust the tension. It s always useful to do a test row of stitches on a scrap piece of your fabric to see if you need to adjust the tension.
- Other machines have a side-to-side switch or a numbered speed setting. Check the machine s manual to for instructions on how to control your machine s speed.
- Refer to your machine s manual for the full range of settings.
- Select the stitch type and length before you begin sewing, not while you re sewing.
Popular Categories on BuyBestBrands.in
Garden & Outdoors : Seeds, Plants, Plant Containers, Gardening Tools, Garden Decor, Pest Control, Barbecue & Outdoor Dining, Solar Power, Fertilizer & soil, Watering Equipment
Amazon Brand : Symbol, Inkast Denim Co, House & Shields, Jam & Honey, Solimo, Presto!, Symactive, Eden & Ivy, Vedaka, Tavasya, Myx


